Multiple kind folks have taken the time to make guides of sorts for marker pack creation, so they're compiled here in no particular order, to the best of our ability!
Marker Pack Academy by Teh
This is a video SERIES, the first of which is here:
So You Wanna Make a Marker Pack by Metallis
This text-and-picture guide is also on the Metal's Marker-mancy Discord.
All information here is an example of how I mark for "Only Fish", YMMV
Tools of the Trade
- TacO (for now, for dropping the markers themselves)
- Blish HUD
- Pathing Module
- Distance Rings Module
- VSCode, N++, or some other robust text editor that can parse
.xmlfiles and (ideally) help ensure you have quotes and brackets synced up - Excel or equivalent
- a Github account or other way to host your pack for update and download
Setting up for Success
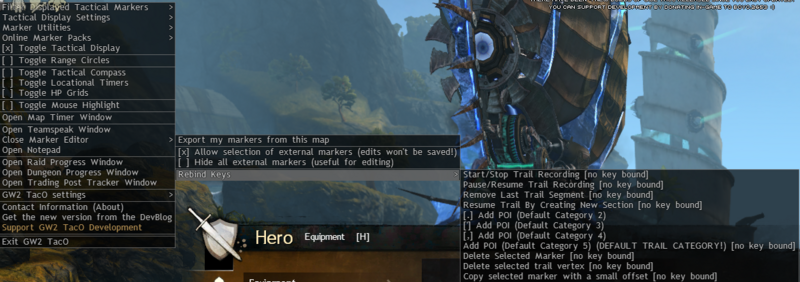
TacO settings:
You can bind the categories to whatever you'd like, but I prefer keys that are used for nothing else
I recommend AT LEAST 2 categories bound, the more the merrier.
I also generally toggle off any packs not related to what I'm working on in both TacO's "Filter Displayed Tactical Markers" and within Blish's Pathing Module.
Blish settings:
- Distance Rings Module
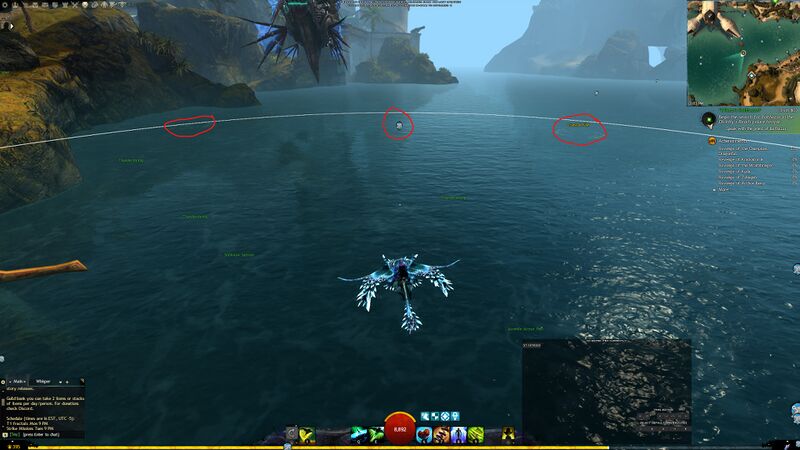
- 1 ring enabled, 3250 distance, no vertical offset. Anything within this ring will show its label if it has one and the appropriate option in GW2 settings is toggled on. The label fade in STARTS at 3500, but it's fully or nearly-fully opaque by 3250. Set to your preference.
GW2 Settings:
"The Dashboard"
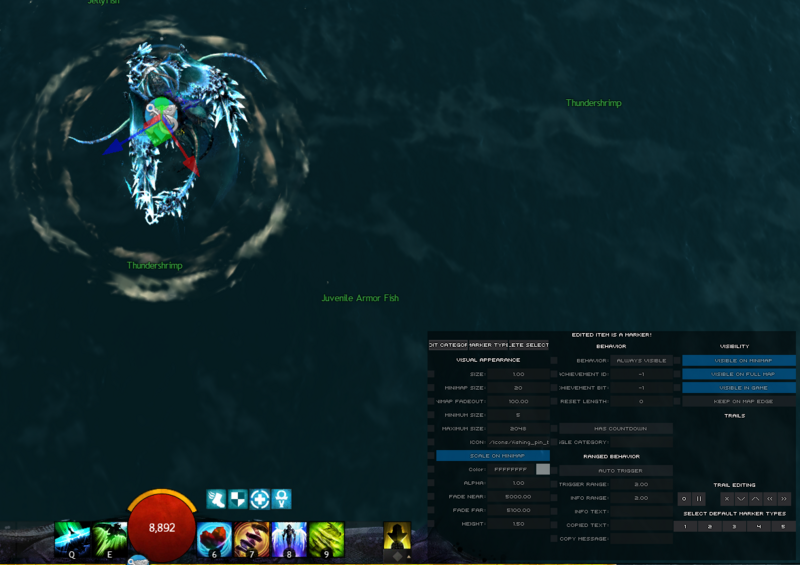
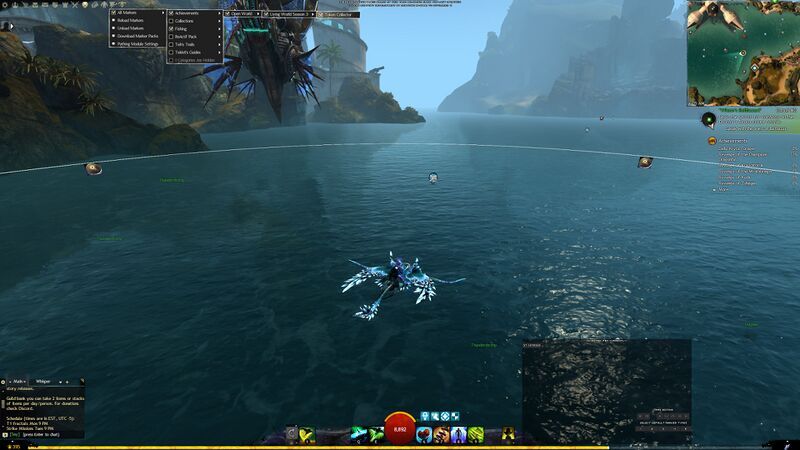
In the picture above, you can see an already placed marker, an unmarked hole within range, and an unmarked hole just out of range (all circled in red)
NOTE: Your Marker Editor may not look like mine. BoyC has made some big changes quite rapidly regarding the editor. I'm running https://github.com/BoyC/GW2TacO/releases/tag/062.3605r for this tutorial. You may want to find "Window Edit Mode" or similar under the "GW2 TacO settings" header in the TacO menus and resize it to see all the attributes. You might also need to select/drop a marker to "activate" it.
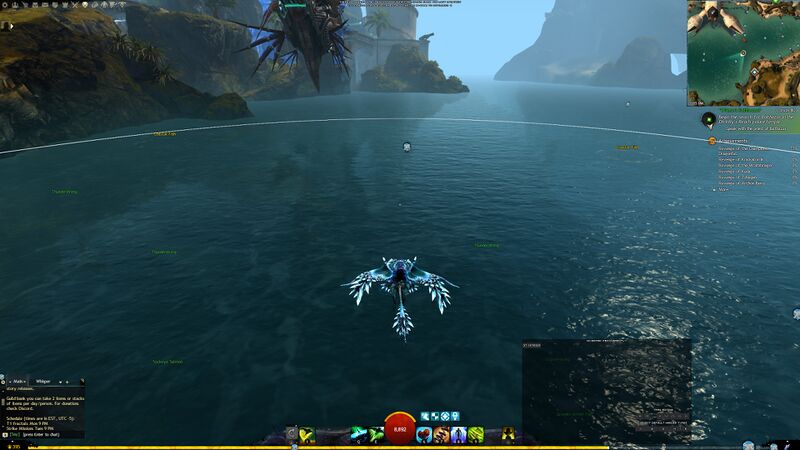
The label appears as the hole on the left moves in range.
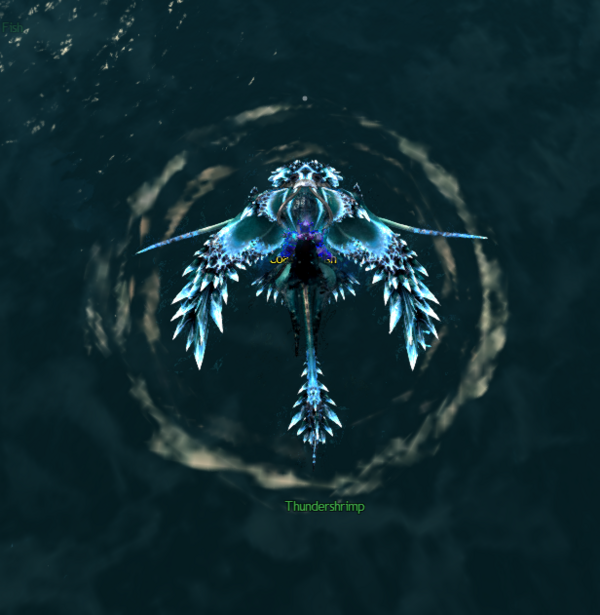
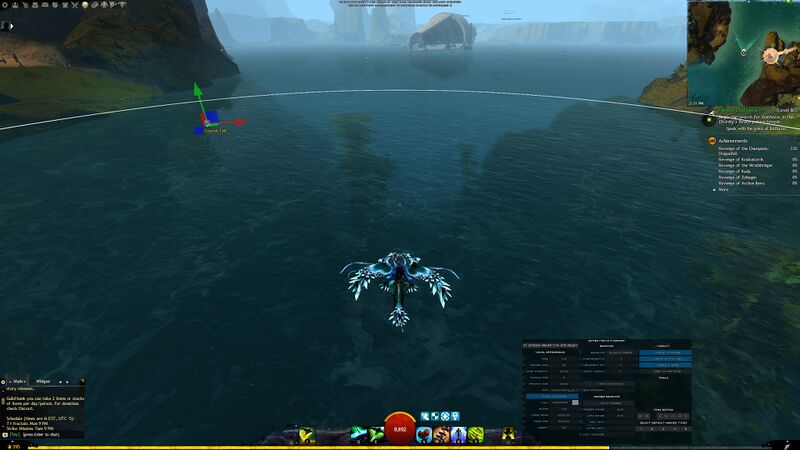
Line up the "shot": For my purposes I like to mark fishing holes on a skimmer, it lets me line up the text between the front and back sets of wings for an almost dead-center marker.
FIRE!
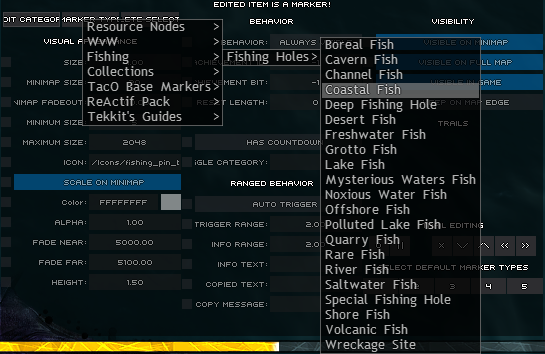
Now for this shot, I pressed my category 1 key (Num +), and rather than the gold diamond, it tossed my custom fishing marker (thanks to Nicodemus in the Blish HUD Discord for the template!)
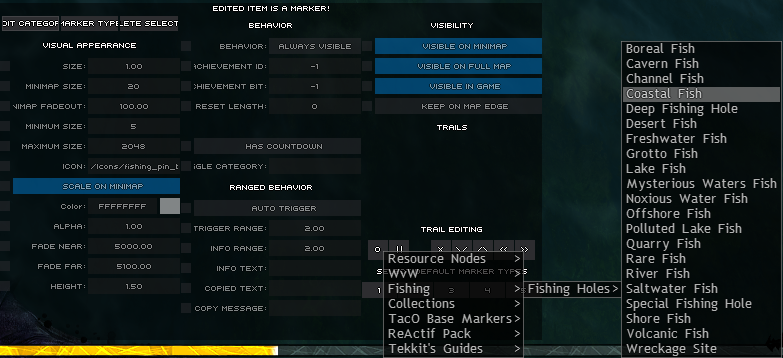
The special icon is displayed because I set my "Default Category" configurations in the very bottom right.
By default, TacO only knows its own default categories, but by loading in any marker pack, it can "learn" about any category configuration in them. For this, I've already loaded an old version of my "Only Fish" Pack, so it knows all the fishing hole categories and that they all use my custom marker.
Now, at the time of this marker drop, my Default Category 1 is for "Desert Fish" holes. and so the marker itself shows like so in the poidata.xml file under the TacO directory, where it stores all new markers.
<POI MapID="50" xpos="-194.279" ypos="1.37639" zpos="-161.135" type="fishing.fishingholes.desert" GUID="xM5D+V2CUEGt0qIpbEik4g=="/>
Anatomy of a Marker
<POI - Required, denotes to TacO and Blish that this is a marker!
MapID="50" - specifies which map a marker belongs to. Every map, including story instances, etc, have a unique ID. So this can be used to show achievement markers, etc only on the relevant story instance and not the overworld.
xpos="-194.279" ypos="1.37639" zpos="-161.135" - denotes the physical location of the marker so TacO and Blish can consistently display it, as the camera moves.
NOTE THE AXES MAY BE DIFFERENT THAN YOU'RE USED TO FROM GEOMETRY. Most of us (myself included) are used to the x-y plane being flat on the table and the z-axis being "altitude". This is still the case, but the x-y plane is now vertical, on your monitor, so the z-axis is "into or out of" the screen and the y-axis would be "altitude".
type="fishing.fishingholes.desert" - the category applied to this particular hole, this is what allows you to turn off (or apply behaviors, icons, etc to) a bunch of markers at once, and just generally helps the organizational structure of a pack. The marker editors will automatically generate relevant category structure based on the categories you assign to markers.
GUID="xM5D+V2CUEGt0qIpbEik4g==" - a Globally Unique IDentifier for each marker. This is to ensure that even if you place two markers in the exact same spot, TacO and Blish can tell them apart and properly display both.
/> - denotes the end of one marker's attributes.
Now because Desert is not the right category for this hole, I manually change it.
If you know you're going to be placing a bunch of the same category of marker, set it to one of your defaults!
Next time you place a marker using that hotkey (in this case NUM +), it will place a coastal-category marker for me, no tweaking needed.
Quick aside: "Why the huge ring? Can't you just watch for labels as you go?"
Yes, I can, but this way, I can easily determine how to make the fewest passes. Like here I know I'll only need 1 pass to check any holes in this outlet. Ring hits both coasts. And that means SWEET SWEET TIME SAVINGS, which you'll gladly pay a premium for if you're making anything more than a personal collection.
HOT TIP: The ring is also helpful when you're hunting for interactable stuff that's well hidden in game, too!
Markers alone, a pack does not make
So you've dropped a bunch of markers and you're ready to start [making a pack out of them]. What do? Time to customize and unify!
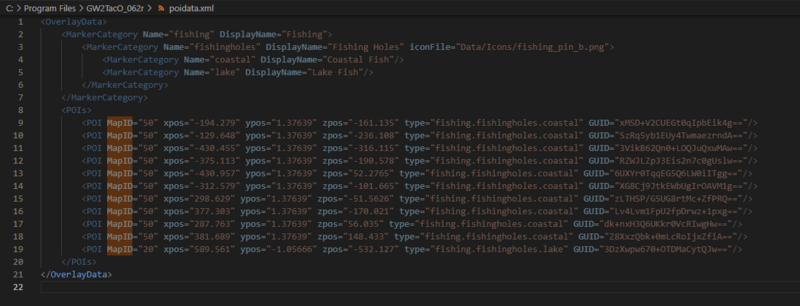
If you navigate to your TacO directory (probably something like C:\Program Files\GW2TacO_062r) you'll find a file called poidata.xml. This is where all those raw markers are stored and this is what it might look like if you assigned categories to markers. If no categories, Line 8 will probably be Line 1.
BIG NOTE: If you want, you can simply copy this poidata.xml file into your %USERPROFILE%\Documents\Guild Wars 2\addons\blishhud\markers directory and (theoretically) Blish will show it after a reload. If you added different icons, you may need to copy them to the relevant location in the Data directory within that one.
This is where you might get really friendly with Find and Replace (Ctrl+H in most editors)
NOTE: TacO will not display changes realtime. I recommend closing TacO ingame, then editing and re-saving this file, then reopening TacO to view your changes. If you use the trick above where you copy (or symlink for advanced users) the poidata.xml file into the Blish directory, it will show changes after "Reload Markers".
https://blishhud.com/docs/markers/attributes/achievement/ is my best friend (not just achievement, all the attribute pages here) for understanding what all you can do with Markers, Categories, and Trails!
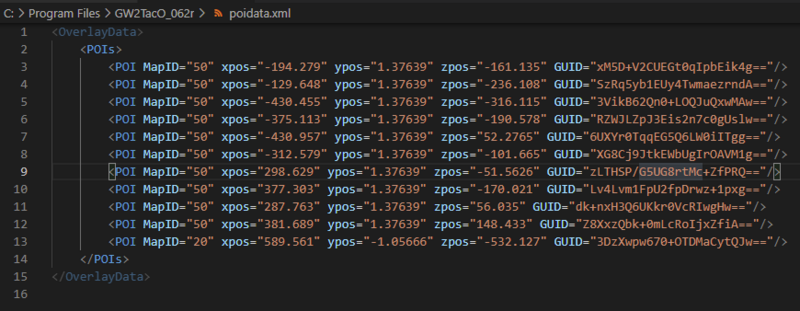
So now, let's say we're working with Average Joe's barely-a-pack, aka lines 8-21 in the above , without categories. Just your standard gold diamond marker. Looks something more like this.
Well you've got markers, now it's time to make them tell you (and others) what they're all about!
So first, they all need to be assigned a category. These are completely up to you, but you can find a suggested high level category file to start with in Recommended Category Structure! You're more than welcome to just toss that file in your pack and edit to your needs, too. In fact, I'd personally encourage it, but that might be a bit of a biased opinion. 😅
Let's say these are all related to https://en.gw2treasures.com/achievement/3129, just for kicks.
Now this is an achievement that has a very complicated setup for markers, but it should give a full scope of what's possible.
Using the categories above, these would all be under "achievements.openworld.lws3.tokencollector", so we perform the following to slap it on everybody at once:
Ctrl+H (Activate Find and Replace)
Pick your spot, I prefer to have it between zpos and GUID in this instance, so my key would be GUID=
Replace with: type="achievements.openworld.lws3.tokencollector" GUID=
Result:
Now, if you're not using a separate marker category file (you can do that!), you'll also need to include the category structure in here too. So we have our structure already made, just a bit of "reverse engineering" now.
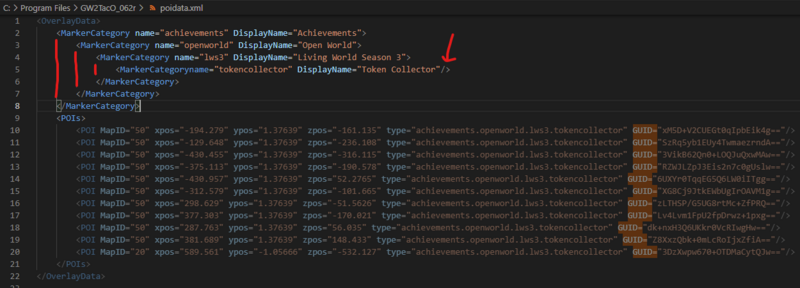
So inserting at line 2 (I believe categories need to be before markers in the file, but could be wrong), we're going to make 4 categories, each a child of the previous. This is done by indenting. And pay special attention to using /> to close inline vs an ending </MarkerCategory> line. You only want to use the former if that category has no children of its own. In this case, the tokencollector category gets that distinction.
Minimum Viable Product (MVP)
Note the 3 red lines, as well. This is how you ensure you have all your categories closed out correctly. VSCode and other IDEs, while arguably overkill for xml editing, can also let you collapse entire subtrees, like this:
Ok, category structure made, markers attached, so as noted above, we've officially reached the MVP (Minimum Viable Product) of a marker pack. But the markers are only going to display the default icons and give no extra information. So it's time to add the bells, whistles, ribbons, bows, fireworks, and all the other doodads that really set your pack apart!
So let's do the easy one and set them apart visually. These tokens don't really have a good icon aside from maybe the gold image in the wallet, so we're going to use a Casino Coin! https://wiki.guildwars2.com/images/5/51/Casino_Coin.png
The base of any marker pack is the xml itself (or many) and all your other resources, especially marker images. Now where you put those images and such is up to you, but I like to organize them in a Data folder and then an Icons and Trails subfolders. Just make sure you're listing the right path! So: Casino Coin image goes in the Data folder, and I note its relative path in the xml. image path is Data/coin.png.
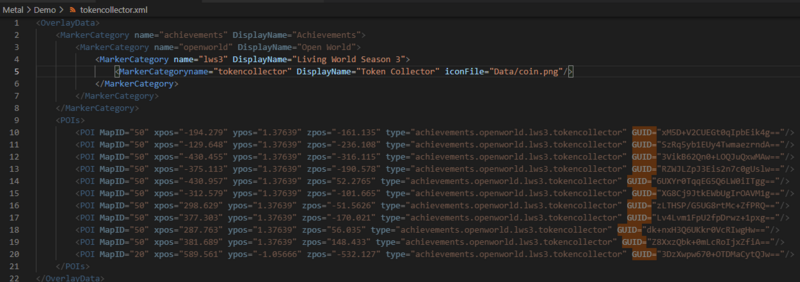
Now here's where you make the hierarchy work for you. You could put iconFile="Data/coin.png" on every marker (40 on the real achievement) or put it at the Category and it gets applied to ALL markers of that category. Proof of concept: If you extract "Only Fish" and look at the xml, you'll only find a single instance of iconFile. At the Fishing Holes category level. All the individual hole types inherit the icon and all of their child markers do too! iconFile once, 2243 (at time of writing) markers changed. 💪
As with most programming and tech-related things, specific beats general. So if you had 39 markers that shared an icon but one that needed to be different (in the same category), define the shared icon on the category and the unique one on that specific marker. This applies to most attributes.
All markers now sharing an icon! (make sure this icon is the right place or you're going to have texture loading issues!)
The Extra Mile ™️
We're done with what many would consider a fully-fledged pack. Zip it up, toss it in the right folder for TacO or Blish to recognize it, then test it in game to make sure it looks and works like you want, then publish that bad boy! But if you're one of those people that wants your pack to be spec-pack-ular, there's more to be done! (bonus points to you if you know the origin of that bolded joke word)
Now, these are all attached to achievement 3129 (as determined by the GW2 API), but each one is tracked by a different 'achievementBit' to specify whether THAT token specifically has been picked up. We're going to pretend there's only 10 tokens in this example and that they're in the right order. Back to Find and Replace!
GUID replaced with achievementId="3129" achievementBit="" GUID
Then manually fill in the achievement bits. For achievements that actually utilize bits, it matches the order displayed in the game UI (as far as I know), so be careful when using the wiki. NOTE: achievementBits START AT 0, LIKE ARRAYS, NOT 1. So the full set for 3129 would be 0-39, NOT 1-40.
Now, these are all attached to achievement 3129 (as determined by the GW2 API), but each one is tracked by a different 'achievementBit' to specify whether THAT token specifically has been picked up. We're going to pretend there's only 10 tokens in this example and that they're in the right order. Back to Find and Replace!
GUID replaced with achievementId="3129" achievementBit="" GUID
Then manually fill in the achievement bits. For achievements that actually utilize bits, it matches the order displayed in the game UI (as far as I know), so be careful when using the wiki. NOTE: achievementBits START AT 0, LIKE MOST ARRAYS, NOT 1. So the full set for 3129 would be 0-39, NOT 1-40.
Cool, so they look nice, and hide based on achievement progress. Stellar. But what if one or all of those are in a REAL TRICKY spot? The kind of spot that could benefit form some good old-fashioned text guidance? Meet tip-name and tip-description! Now these are specific to Blish HUD. They allow you to display hover text on the minimap/world map. Handy right? So now we'd like to display the token number (as listed in the achievements pane) as well as the description given so your users don't need to keep the hero panel or wiki open for guidance. After all that's the point of an overlay! To have the information available while you're in game!
One more Find and Replace, but then quite a bit of manual copy-pasta. Nobody said making a killer pack was easy work, but your users will thank you! GUID becomes tip-name="Token " tip-description="" GUID
Then it's a matter of filling in the blanks with info from gw2treasures, the wiki (again be careful!) or directly from the GW2API. "But Metallllll...That'll take forever!" you say. Fear not, this is where my green-belt (or relevant 1 above white-belt) experience in Excel Fu gets to proudly show off. We're going to be bouncing around and it might get confusing, but in the grand scheme of things, you're saving yourself work. I apologize if this is a bit hard to follow.
Current, unfilled tip fields on our markers:
1. Copy all the lines to Excel (or Google Sheets, or Apache OpenOffice, etc). Your spreadsheet editor of choice. I like to "Paste as Plaintext" to avoid bringing over the coloration from VSCode.
2. Data > Text to Columns > Delimited > Space > Finish
Result:
Delete a couple blank columns from the indentation, resize the remaining columns and (barring a few minor issues) we have our lines split up pretty nicely. Green cells can get left completely alone.
The meticulous among you may notice that we lost a couple " (quotations) in the translation. I'm not positive what the cause of this is at time of writing, but I'll update this section if I find out. It's a minor inconvenience. Text to Columns on column J again, because it didn't split properly. Typically, you only need 1 column where you want to fill info in, but I'm making 2 extras for those missing quotes.
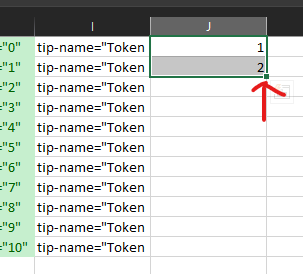
Drag extrapolation first. Establish a number pattern (in this case, it only takes 1 and 2 before Excel figures it out). Then select both and grab that tiny square in the corner that you may never have noticed before and drag that down as far as you need and marvel at one of Excel's many beauties.
Same principle for the next column, just do a single " and drag it down. You're saving yourself some hassle later, I promise. Copy that whole quote column and slap it in the column before GUID, while you're at it. Things are starting to come back together.
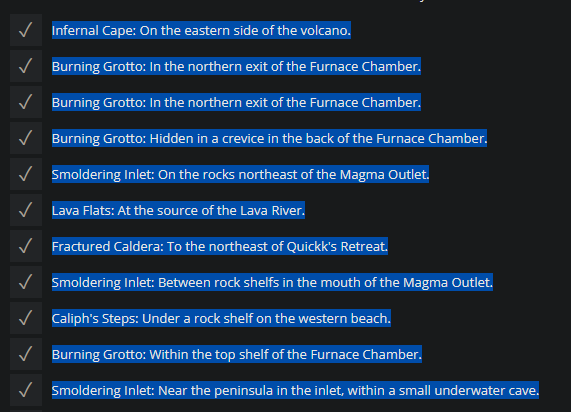
Now we just need those pesky descriptions. I'm grabbing from gw2treasures because they're easy to copy as a batch. Paste 'em all into that empty column! Those are looking like some meaty markers, friend. Good work. Big breath, we're on the final leg.
At this point, I like working with these nearly-finished markers in Notepad++ because I'm intimately familiar with how to abuse the absolute life out of its specific Find and Replace functionality. You're welcome to kick them back to your preferred editor and do it there, I understand if you don't want to add ANOTHER tool to the pile. Copy ' em all, paste in. You're going to want to turn all the tabs back into spaces. N++ has an "extended" function that allows you to use "escape characters" which are typed symbols beginning with \ that equate to specific other things, like tab or variations on "Enter". Ctrl+H > Extended > \t becomes .
There's a few errant spaces that won't affect functionality, but I'm a bit of a perfectionist in my work, so bye bye! Ctrl+Z, but this time, we're replacing \t\t with \t. Repeat until it replaces 0. I'm also going to remove those pesky tabs at the end (these can be avoided if you're particular with the cells you grab from Excel. \t\r\n becomes \r\n. And yet there's STILL some errant tabs related to those quote columns we made. \t" and description="\t both become just ". Specify more than just "\t, because otherwise it will start slamming together other fields that were green in Excel. Finally, finish up with a \t to once more and marvel at your work. I know it seemed awful, and you might just prefer to copy and paste those 40 descriptions in rather than this whole ordeal, but once you start working with dozens, hundreds, or thousands of markers, potentially all at once, you'll be back. And I'll be here with a hug and some coffee, because we've got work to do, you glorious budding Markermancer, you!
The Gravy Train (extra credit territory)
You've done everything that could be reasonably expected of a marker pack, especially a fresh one. (Just test it and make sure it's looking and working good!) For anyone who has reached this point and doesn't know, .taco files are just renamed .zip files. Windows comes with zip utilities pre-installed, anymore. Then you just Right-click -> Rename or hit F2 with the .zip selected and change the file extension. (You may need to enable View -> File name Extensions). Yes on the confirmation.
I'm gonna link back to https://blishhud.com/docs/markers/attributes/achievement at this point and encourage you deeply to explore all your available options. There's an insane amount you can do with some clever thinking.
- Need to make your marker icons bigger than they are by default (or smaller)? iconSize is a multiplier value you can use.
- Markers covering the harvesting node you're making note of? Raise them off the ground a little more with heightOffset.
- Marker tied to an achievement but not a bit or you want to be able to toggle them off until reset? behavior's for you.
- Showing off skips in a jumping puzzle, but they can only be done if you have a shadowstep? profession or specialization restrict them from showing if you're not playing that class.
- Want markers to only show at night because you can't progress the achievement during the day? schedule them!
Every attribute page also tells you whether it works on TacO or just Blish HUD.
A final look in game at the new markers!
FAQ
1. You can actually edit markers directly in your /markers directory of Blish to make testing changes very easy! The only requirement is that all icons/trails need to be copied into /markers/data, not just your pack subdirectory. This is because (for now) Blish doesn't distinguish where the actual root dir for an xml is if it's not packed in a .zip or .taco and so it just assumes the /markers dir is the root directory.
Ex: My /markers directory looks like so. All the Icons and Trails from the MMM/Data and OnlyFish/Data directories get copied into the respective directories under the default data.
markers
- data (default, part of Blish install)
- Icons
- states (default, part of Blish install)
- Trails
- user (default, part of Blish install)
- Metal Marker Myriad
- Data
- Icons
- Trails
- xml files
- Data
- Only Fish
- Data
- Icons
- Trails
- xml files
- Data
